Showing posts with label crafts. Show all posts

Thursday, June 25, 2009

Neck Pillow Tutorial

The second week in July we are going on vacation! I am SOO excited! Now that we live in Texas we fly to most of our vacation destinations...but not this time. This time we are doing a good old fashioned road trip and I am excited...sorta! I love going on road trips with Greg...the open road, singing along to old-school DCTalk, talking, reading books, taking random photos of the side of the road. Ahh....memories! We used to make lots of trips from St. Louis to Milwaukee and Indy.

But alas, a LOT has changed since those days of care free road-tripping. We added two kids to the mix. The longest road trip we took these kids on was driving back to San Antonio from Milwakee via two days in St. Louis, but my mom was with us...and Micah was pretty little...so he slept most of the way. As I said before, things are different now. I know the kids will do great and we're going to have a great time but I'm planning a lot of things for the trip and planning on making it successful.

One thing in my plans to make the trip successful was to make little neck pillows so that if and WHEN the kids fall asleep they don't break their necks in the process. I figured, how hard can it really be to make a little curved pillow? Well, it wasn't all that hard actually. And here's my little tutorial to prove that anyone with a little basic sewing knowledge can make a neck pillow too! Because really my sewing knowledge is BASIC!

Here's the end product...but how did I get there? (Isn't he handsome?)

I started by drawing my shape on the wrong side of the fabric and pinned right sides of both fabrics together.

I then sewed around my line using the line as my guide.
Then I cut the shape out, about 1/4 inch from the sewn line. I found it MUCH easier to sew the shape and then cut it out rather than trying to sew the already cut shape. It's a good thing I have to do things twice because it gives me an opportunity to try it a different (and hopefully easier) way.
Turn the pillow right side out...I added this ribbon to Naomi's because originally I was going to use white chenile on the front but forgot so the ribbon is to differentiate between Micah's and Naomi's...plus I think it's cute!
Here are the two pillow forms waiting to be stuffed. They look the same basically but I made Naomi's a little wider at the bottom.
I stuffed the pillows pretty tight and then sewed a line near the top so that stuffing would stay tight in the bottom. I didn't fill the part between the lines too full because I didn't want it to push their heads forward.

Here are the pillows in action (she's faking it)...
(he's not).

Hope you enjoyed this little tutorial. If something isn't clear let me know and I'll try to clarify. Let me know if you make one...I'd love to see it!

Wednesday, June 10, 2009

My Space

I have finally gotten my crafting corner cleaned up and organized. I'm not 100% done but about 85% which is pretty good. Compared to what it used to look like this is looking pretty awesome. I am so grateful that my hubby allowed me to put all my crafting things in our bedroom. I would use the basement, but alas, we do not have one.
The top shelf in my closet is full of stuff too. Mostly negatives and doubles, fabric and cross-stitching items. I know, I probably have too much stuff but I cannot imagine giving/throwing any of it away. I'm just not ready yet. Although I did do some downsizing, it probably wasn't enough according to Greg. Oh well. At least it's all put away nicely now and out of Micah's closet.

Monday, June 8, 2009

Egg Carton Flowers

When I buy eggs they usually come in a styrofoam container. I would really love to get the paper ones but our grocery store doesn't really carry them. Why does it matter you ask? It would be nicer on the environment if we bought paper and the paper ones make better craft projects! So while the kids and I were on a really long walk the other day I happened to see a paper egg carton on the sidewalk, so I picked it up. Gross? Not really it was just a container for cascarones. I have no idea if I spelled that right but cascarones are these little confetti filled eggs that they sell around Fiesta time. I knew what I wanted to do with the paper egg container and once we got home we started on the project.

Naomi and I painted the container and then after letting it dry during nap time we made the container into little flowers. She really liked putting the pipe cleaners through the leaves and the bottom of the flowers. I asked her what she wanted to do with the flowers and she basically told me that she wanted to keep them for herself. So, I encouraged her to think about others and give them to the staff at church. So a couple days later we went to church to give out the flowers and to teach Naomi about giving and sharing our gifts with others. We also gave one to Anna because she watched Micah so that Naomi and I could give out the flowers and go grocery shopping. Thanks Anna.


Micah enjoyed a little coloring...till I had to take the crayons away because he was eating them.

Tuesday, June 2, 2009

Card Table Tent

I have been dreaming about the card table playhouse for my kids for a while now. And I finally did something about it. I made the dream a reality in my own way. We got the card table out last week and threw some blankets over it. The blankets were dark and hot. So, I decided it would probably be better with some sheets. I knew that I had some thrift store sheets just waiting to be used for something so I got those out and threw them over the table. The kids loved it.

I decided to take things one step further. I wanted to make a tent that actually fit on the table and something that could be easily put away. I thought up the design in my head and took some measurements and two nights later I had this card table tent all ready for the kids to play with.

It is by NO means perfect.
The sides aren't all the same length.
The patterns don't exactly match.
But, my kids and I could care less.

They LOVE playing in their new tent and ask for it to be set up everyday (because I like to have my living room back in the evening).

How did I make it? Well, I measured the length and width of the sides and cut two pieces of old sheets for each side. I sewed them right sides together with a ribbon at 10 and 20 inches on both sides. Then I turned them right side out. (I was thinking about top stitching all the sides but didn't feel it was really necessary and I didn't want this project to take me forever.) For the top I used a whole twin sheet. It worked out perfectly to fold the two edges to the middle and sew those down. Then I cut the sheet where it was ending on the table. I sewed a hem in the cut edges and the rest was already finished off because it's a sheet so that made it simple. Then I sewed the three sides onto the top/front piece and I was good to go. Usually when people make these things they make it so the stitching is down but I like it on top and if I really wanted to I could turn it over...it's sorta reversible. I left a big chunk of fabric in the front because we like to put it on chairs and it makes the tent even bigger. It's sorta like an awning!

So, for a huge fraction of the cost of a felt card table playhouse I made my very own. My kids love it and I'm proud that I could make something with just ideas in my head and turn it into a reality. Plus, I can easily wash this and it cost me about 5 dollars to make! Yay! Now, go make your own!


Thursday, May 28, 2009

Painting and a rambling of sorts

I love to paint. I love the colors, the mess, the freedom.

I'm not particularly good at painting but I just love to paint.

My best friend is an amazing artist and she can paint like no one I've ever met in person. She paints from photographs and with her own style and twist makes that photograph come to life.

I studied art in college for two years.

I was a graphic design major. My college did not offer a photography degree otherwise I would have majored in photography. So I went with the "next best thing" as my advisor told me to.
Being an art major had its perks. I got to paint. I got to sculpt. I got to throw pottery (on the wheel of course). I got to try my hand at printmaking. I made a stained glass window that still hangs in the halls of my alma mater. My tests were easy and papers were almost non-existant.

I loved everything about my art classes...until I really started the graphic design classes. I took a few classes and liked them enough but there was just something that was holding me back. My skills were not on par with my classmates. My desire to work as a graphic designer was changing.

In the middle of the first semester of my junior year of college I changed my major. I was always one of those kids who said, I'll never change my major, I know what I want to be when I grow up. Well, I shouldn't have said that. Come on, who really knows what they want to be when they grow up, when they are only 19 years old? Okay, some people do. Well, I guess I never really wanted to be a graphic designer in the first place, just a photographer so it was only time till I faced the facts, right? I guess I did know what I wanted to be when I grew up when I was 19 years old. I just went to the wrong college to make that dream a reality. But college was free so I wasn't about to pass that up (by dad is a prof).

Eventually when all was said and done I graduated from college with a Major in Theology. I had minors in Lay Ministry, Youth Ministry and you guessed it, Art! All those art classes my first two years made my art minor a given. I was going to be a youth minister and I was excited. I had no idea what the future held for me but I was a fresh graduate and a new Mrs. so I was ready to face the world.

I worked as a youth director for two years while my husband went to the Seminary. I was his sugar mama. I loved working with the youth. I had a blast creating retreats, programs, Bible studies and just hanging out and getting to know who they were and what they struggled with. It was an incredible time in my life. I was very happy with where I was at in life. I used my graphic design background to help create eye catching flyers and postcards for the kids. I designed many t-shirts and posters. I had just enough knowledge about graphic design to make me dangerous.

My love for art has never left me. It has changed. My appreciation for different mediums has grown over the years. I don't have a complete knowledge of the subject because really, 8am is not a great time for art history class and a dark room with the soothing voice of the professor narrating the slides just isn't very condusive to my learning style. But I slept great!

I taught myself how to cross-stitch after seeing my aunts do that for many years. I asked my mom for a sewing machine for Christmas when I was 25 even though I didn't grow up with one in the house. I taught myself how to sew...and I had lots of help from two wonderful women! I have dabbled in just about every craft medium there is. That is why my husband says that I have a new hobby every week. That is why my shelves are full of supplies. I may need them again. I have a hard time parting with art supplies. I think I need to see someone about this. I need to get my new craft space organized and whittled down.
I am itching to get creative again. To throw caution to the wind and just paint whatever I want. To sew a closet of dresses for my little girl, because she wants to wear a "pretty dress" everyday. I am so wanting to make my own embroidery designs. I want to start the t-shirt quilt for Micah's bed that is waiting. I really just want to have a crafting day where all I do is craft to my hearts content. No worrying about the mess or the diapers, or dinner. Just being creative. Moving from one project to the next even before the first one is finished if that's where the creativity is leading me. Ah. It sounds so nice. But it doesn't sound realistic. I guess I just need to manage my time better and try and get something created in the hour I may get during the day and the few I have at night.
All this to say, I love watching Naomi paint and experience some of these crafts for the first time. I have to make myself just sit back and watch and not tell her how it's supposed to be done because I'm not inside her mind and I'm not sure how she wants it to be done. She seems to like painting and creating as much as I do...but not quite as much :). It makes me so happy to paint with her and see how her creative mind works. These things make me happy.Then you may also understand why these things (below) make me sad. Micah was trying to eat the paint so I told him no, rather loudly so as to startle him and make him stop what he was doing and he just cried and cried. I think I scared him for life. I hope he doesn't give up on trying to paint and do other creative things. Oh and he was tired, really tired, and a little hungry. Probably not a good time for his first painting experience. We'll try again another day.

This is the stained glass window that two of my classmates and I made, and it is still hanging proudly in the art hallway!I love all the creative inspiration that is around me. Lots of blogs and websites. Lots of great stuff in magazines and books. And just from life happening around me. People tell me, "you're so creative, Jamie" and I just have to laugh because if they only knew that 90% of my creativity is stolen from other peoples ideas they probably wouldn't say that. ha!

Sorry to keep you so long. It was fun to reminice and trace my steps of creativity. This is not what I intended to post about tonight when I sat down at the computer but it's just as well. Have a great night! Go create something!

Thursday, April 23, 2009

Veil

My friend Kari is getting married on Saturday...so EXCITED! She asked me to make her veil. No pressure right? It's not like I'm altering the dress. It's not like I'm the caterer. It's not like I'm the wedding photographer right? I've had that pressure before. I'm just making the veil and really if it's not that great she can always decide to not wear one right? Well, all that being said, I think for my first veil it turned out okay. I'm not sure if it's exactly what Kari envisioned but I think it's close. I hope she likes it. I'll make sure to get a photo of it in all its glory adorning the head of the beautiful bride on Saturday. But she'll be beautiful even without the veil, so it's really not a big deal. Just check one more thing off the "I can do it" list.

From this:

To this:

Monday, April 20, 2009

Apples!

While watching "Australia" with my husband last night I created these felt apple slices. I looked at a few tutorials online and got the general idea of how they were done. I think the most helpful tutorial that I saw was here. It just helped me get the concept down although I already had the initial idea of how it would work in my head. I'm glad to see how other people do it so I know what works and what doesn't. I hope to make some carrots soon...and maybe some green veggies too, we'll see if I have time! Have a great week. Off to clean my crafting area!

Sunday, April 19, 2009

Concentration

Naomi got a little paint your own pot kit in her Easter basket and decided the other day would be a good time to paint it. She concentrated really hard on painting this pot and had a great time making it her own. Next, we're going to plant a sunflower in a little pot and get it to start growing with the hopes of transplanting it once it gets big enough. I think both these things came from the dollar spot at Target.

Sunday, April 12, 2009

He is Risen!

He is Risen indeed! Alleluia!!!


Happy Easter!
Happy Resurrection Day!
The greatest day in the history of the world.
No other religion worships a G(g)od who is alive!
Praise God for raising Jesus from the dead!
Alleluia!

We have hope.
We have joy.
We have love.
We have a Savior who died for us because He loves us.
What an amazing gift.
I finished the balloon eggs during Naomi's nap and then when she woke up she helped me put the Easter grass inside. I just have to find something to put inside.

Thursday, April 9, 2009

Balloon Eggs

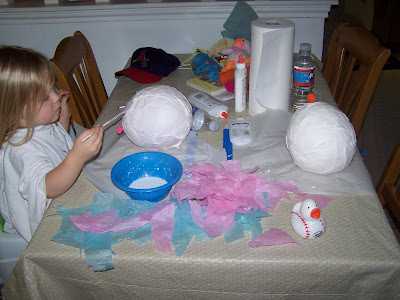
If you're looking for a messy but fun Easter craft look no further. I had seen this the other day and it brought back memories of grade school. I figured Naomi and I could do this pretty easily if she allowed herself to get dirty. I wanted to post this now even before we finished in case anyone else out there thinks they may want to try this. You'll need some time to let the craft dry so start it today!

We had a great time making this craft and it really held her attention. I've seen some tutorials on this craft that say to use 50/50 glue and water and well, we didn't do quite so much water because we wanted ours to dry before Easter gets here. So we eneded up using a lot more glue, but it's a small price to pay. Once we got to the tissue paper part we used paintbrushes to put the glue on the tissue paper once it was on the balloon because it was very "fragile". I liked the idea of using paper towel that I saw on someone elses blog because it was really strong and I could wring out some of the glue and still open it up to use on the balloon (just make sure to use a good quality paper towel). Now, the balloons are hanging up to dry and on Saturday I plan on popping the balloon and decorating them a little more! Happy crafting!
Naomi had a great time painting with the glue and painted for quite a while after we were actually done with our balloons. She said she was making a pretend balloon!
I plan on making these next.

  © Blogger template 'A Click Apart' by Ourblogtemplates.com 2008

Back to TOP