Showing posts with label sewing. Show all posts

Thursday, June 25, 2009

Noisy Taggie Square

I saw this tutorial at Joy's Hope and thought this would make a great little toy for Micah to play with during our 10 hour road trip! It was very simple to make and I can't wait for him to see it...I hope he plays with it for a long time! It's hard to keep one year olds occupied in the car, since he can't have crayons (he just eats them) or books (he just eats them) and since he throws most of his toys anyway. We'll see what he thinks!

These will make great baby gifts in the future too!

Neck Pillow Tutorial

The second week in July we are going on vacation! I am SOO excited! Now that we live in Texas we fly to most of our vacation destinations...but not this time. This time we are doing a good old fashioned road trip and I am excited...sorta! I love going on road trips with Greg...the open road, singing along to old-school DCTalk, talking, reading books, taking random photos of the side of the road. Ahh....memories! We used to make lots of trips from St. Louis to Milwaukee and Indy.

But alas, a LOT has changed since those days of care free road-tripping. We added two kids to the mix. The longest road trip we took these kids on was driving back to San Antonio from Milwakee via two days in St. Louis, but my mom was with us...and Micah was pretty little...so he slept most of the way. As I said before, things are different now. I know the kids will do great and we're going to have a great time but I'm planning a lot of things for the trip and planning on making it successful.

One thing in my plans to make the trip successful was to make little neck pillows so that if and WHEN the kids fall asleep they don't break their necks in the process. I figured, how hard can it really be to make a little curved pillow? Well, it wasn't all that hard actually. And here's my little tutorial to prove that anyone with a little basic sewing knowledge can make a neck pillow too! Because really my sewing knowledge is BASIC!

Here's the end product...but how did I get there? (Isn't he handsome?)

I started by drawing my shape on the wrong side of the fabric and pinned right sides of both fabrics together.

I then sewed around my line using the line as my guide.
Then I cut the shape out, about 1/4 inch from the sewn line. I found it MUCH easier to sew the shape and then cut it out rather than trying to sew the already cut shape. It's a good thing I have to do things twice because it gives me an opportunity to try it a different (and hopefully easier) way.
Turn the pillow right side out...I added this ribbon to Naomi's because originally I was going to use white chenile on the front but forgot so the ribbon is to differentiate between Micah's and Naomi's...plus I think it's cute!
Here are the two pillow forms waiting to be stuffed. They look the same basically but I made Naomi's a little wider at the bottom.
I stuffed the pillows pretty tight and then sewed a line near the top so that stuffing would stay tight in the bottom. I didn't fill the part between the lines too full because I didn't want it to push their heads forward.

Here are the pillows in action (she's faking it)...
(he's not).

Hope you enjoyed this little tutorial. If something isn't clear let me know and I'll try to clarify. Let me know if you make one...I'd love to see it!

Friday, March 27, 2009

Not Broken...

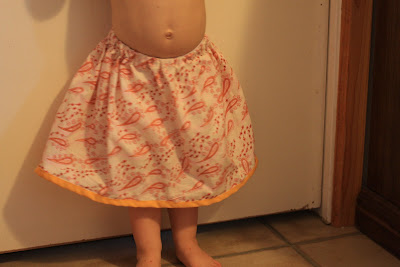
My machine wasn't broken afterall. I changed the needle again and tried some new thread and it seemed to work just fine. So, while I was in the sewing mood I got a few things accomplished. I finished the pillow and burp rags for my little goddaughter, Faith. I made a felt lunch bag and I made a skirt for Naomi. I love the fabric that I used for this skirt and I still have lots to work with. Maybe I'll just keep making more and more skirts for her as she grows. She loves to twirl in her new skirt too! She's really been into dancing lately so it makes me happy to make her a skirt that she wants to dance in!This skirt was pretty simple to make (which is good since I don't have a lot of patience for fussy sewing and I have limited knowledge on the subject). I just cut the length that I wanted for the skirt plus about an inch, then sewed the two ends together so that no seams were showing. I'll have to post a tutorial on that sometime because it's really a neat way to sew things without having a serger. I made a pocket for the elastic at the top and then threaded the elastic through with a safety pin and closed the gap where I put that in. Then I sewed some ribbon onto the bottom of the skirt. I started with sewing the ribbon flush onto the underside of the skirt then folded it over to the front and sewed that down. Pretty simple but pretty nice too! Naomi loves her skirt and I can't wait to make her some more!
Friday, March 6, 2009

Business card holder

I love it when sewing projects are easy, fast and awesome! This business card holder is just that! I loved the fabric that Jodie sent me during the Itching 2B Stitching swap a couple of weeks ago and I knew I wanted the leaf fabric to be in something I'd see a lot or just hanging on my bulletin board (that's where it was since the day I got it, but now I get to carry it around with me). While blog surfing I happened along this tutorial for a tea wallet that mentioned at the bottom that it could also be used to business cards. Well, since I've got business cards that I like to hand out I thought this would be perfect. And since I knew that would be in my purse all the time I knew that it would be a perfect fit for my new favorite leaf fabric. I love how this turned out and it seriously only took me about an hour...it wouldn't have even taken me that long if my sewing machine wasn't being a putz! Ugh! It would not sew the edge stitch along the whole thing. I don't know if there was too much there and it couldn't get through it or what but the thread kept coming out of the top needle and I had to rethread the thing about 20 times and I'm not even exagerating. At any rate. I got the business card holder done and can't wait to make some more!
Thanks Jodie for the awesome fabirc...I can't stop looking at it!

Friday, February 27, 2009

Re-purposed

Maybe you remember this bag that I made. Well, one of the handles fell off and since I made it prior to really learning much about sewing I decided to make it better. I fixed the "hem" so that the edges were under and wouldn't fray. I made new handles from the front pant leg so that they would be seamless and longer. I also made sure to sew them so that no edges were exposed. I also took one of the back pockets from the pants and sewed it inside the bag so I would have an inside pocket as well. I'm really happy with how the re-finished bag turned out and I use it as my purse. It's great to re-purpose old clothes that are worn out or no longer fit. It's my little way of saving money and "going green". I have an old pair of jeans and cords just waiting to become purses for someone else!


Apron

I made my first apron and I am very excited about it. It turned out really good for my first attempt at following directions from a book. Usually I just make up my own "patterns" as I go. I used the apron pattern from In Stitches by Amy Butler. I haven't used the apron yet since I haven't really done any cooking since I made it, but I am excited to use it! ... and I can't wait to make more for my loved ones. If you get an apron for Christmas or your birthday this year please act surprised!


Tuesday, February 24, 2009

Baby Blankets

Last night I took the time after the kids were in bed (and after we watched 24) to sew some baby blankets. This was a very simple project but I just love the way they turned out. The fabric is so cute, I don't want to part with them. But I'm happy to be able to spread the love and send them to little ones that I love! I used a half yard of two fabrics and stitched them wrong sides together, leaving a small opening to turn them right side out. I've made pillows before and didn't really know how to close them properly, so last night I got online and found a tutorial for stitching things like that closed. I guess if you sew a lot it seems silly that I didn't know how to close them properly but I've really just taught myself a lot of the things I do. So, I used a blindstitch and I'm really happy with the way it finished off the blankets.I am so excited that they turned out pretty good. They may be a bit small but I envision them being used more as lap blankets for the stroller or car seat, or somethinng like that. I hope the little ones who receive these in the mail really like them as much as I do. M is sleeping with his right now. Hopefully the jungle animals won't wake him up!

Sunday, February 22, 2009

Surprise party

On Saturday night I threw my husband his sixth surprise birthday party.
Not six in one night.
Not six in six years.
But six within the ten years that we've known each other. Each one was different, with different people, different stories leading him there but each one was successful. This one was a little less dramatic but fun none-the-less. There were three people there to surprise him but we still had a great time hanging out and laughing. The night started out with Greg, his best friend Jordan, and I going out for dinner at Texas Roadhouse. It was nice to go out, just the three of us (it's been a LONG time since that has happened). Then we went home and had the party, and some really yummy chocolate cake. It was a fun night and I hope Greg was at least a little surprised! Happy 30th Birthday babe! I love you!I made a gift bag for Greg's present from a fat quarter of fabric and some ribbon! I think I'll do this more often, really saves from wasting more paper!N helped her daddy blow out his candles!

Birthday Banner

I've always wanted to make a some-what permanent birthday banner...and since my sweet husband is turning 30 this year, I thought this would be a great time to do it. I had the idea that I could really make it happen on Friday...and I was having a surprise party for him on Saturday. I wasn't sure if I could actually get it done on time...but I did. Well, mostly done. I haven't decided if I'm going to stitch each letter to the ribbon or not. I like the flexibility that I have right now with being able to make it shorter or longer...so we'll see.

I made it all up on my own and maybe next time (if there is a next time), I'll make the letters bigger. I made the letters in Microsoft Word (arial black) and then cut them out, traced them (backwards) onto the maroon fabric and then cut them out. I cut the background piece to be 5x14 and stitched the letters to the bottom half of the fabric. I have never really been taught how to stitch and move things at the same time so the stitching on the letters looks a little funny on some of them (just makes it look more homemade). Then I folded the pieces right sides together and stitched around the three sides leaving a little space at the top of the sides to turn them the right way and also to hang them. I didn't have to stitch the top since it was just folded over. They turned out pretty good. I made a blank one so that I can put numbers on there...maybe with velcro or something, I haven't thought that one all the way through yet. Any suggestions?

Greg helped me hang the banner (not knowing it was for his surprise party) by putting two hooks in the wall so I could attach the ribbon. I'm excited about these hooks because I plan on putting ribbon and some clothes pins there to hang art work or photos when it's not someone's birthday!

It's hard to get a good picture of the banner because it's not hanging in front of a blank wall. But I think you get the idea.
A little more detailed.

Tuesday, February 3, 2009

SEW excited

My package from my swap partner arrived today (thank you SO MUCH J!). I am so excited about the fabrics I received...they are gorgeous! I love them all and can't wait to put them to good use! I just have to make the time and figure out what to do. I know the "kid" fabric will be put to good use. I've been thinking about making a little doll quilt for N's babies! Any other ideas out there for what to do with scraps of fabric?


Tuesday, December 23, 2008

Pajamas

I made pajamas for my niece and nephews for Christmas this year. I had the idea when I was walking through the JoAnn fabrics near my house that was closing. All their fabric was on clearance because they wanted to get rid of everything rather than having to move it. I found this fabric and fell in love and thought it would make some great pj's for all the kiddos. I got a pattern and some help from a friend at church but once the first pair was done I was able to do the rest myself. It feels good to accomplish something like that and to be able to create something that people will wear. I still need to make some for my kids but at least I got the others done on time. I also really like doing the freezer paper stencils so I made "personalized" t-shirts as well. The kids really liked then but I missed seeing their faces when they opened their pj's! Maybe next time!
For A!For M!For NFor E!All the kids in their pj's!

  © Blogger template 'A Click Apart' by Ourblogtemplates.com 2008

Back to TOP